Week of February 19, 2007

The temperature got just a bit warmer which allowed us to finish the last framing bits before we start to add the construction details to the building enclosure which will allow the house to deal with managing the moisture. More on that in the later entries when we get to them.
Megan and Vinnie apply sheathing to the bandboard.


Eugene and Jesse shoveling our walk. Not all jobs on our build involve nailing and it was very nice that these two did this job.


Upper left: The class installing sheathing over the bandboard and chipping the ice and snow off of of the back porch gravel.
Upper right: Scott and Phil saw under the bottom plate to enable them to bump out the wall. A huge thanks is owed to Dave M., Scott, Craig B. Stacy W., and Phil who came out to help us this weekend.


The best part of site is lunch which was provided by the Link's.


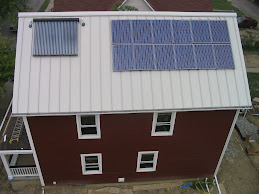
Explain the Green High Performance Building Feature:
Look at where the shadow is cast on the wall cast by the roof line. Notice where it is in relationship to the top of the second floor windows. Also, look at the same feature in the picture above of Phil sawing. Where the bottom of the shadow hits the south wall of the building is not an accident. Josh Lloyd, who drew up the plans, designed for the roof line shadow and the placement of the windows to work together. Can you explain why it is important to have the shadow/window relationship as it is on our building? Josh will explain that to you in next week's journal entry.


We now have garage walls ...


...and a water-tight roof.
Week of February 12, 2007

We only had one day on site this week. School was closed for two days and the other day we were going to be on site it was -3 degrees.

We had lots of snow this week but on Saturday, we did some work moving a wall.


Students outside our house on Saturday. It snowed most of the day.


Green-High Performance Construction Feature
Our concrete flatwork subcontractor just sent this picture that he took with his camera phone to document that he did indeed put in the foam beneath the slab. This foam beneath the slab is critical to keeping a basement dry and warm.
1. It reduces the moisture coming to the slab.
2. Warms the slab keeping moisture from condensing and wicking to the inside of the basement.
3. The cut-outs in the foam are directly over our pier supports for our posts that support the first floor. The concrete basement slab will bear directly on these concrete piers.

Getting subcontractors to do something that they don't do and have never done before is another one of those little educational "discussions" that has taken place during the construction of this house.
Week of February 5, 2007

School was cancelled Monday, Tuesday, and Wednesday of this week and Friday was a professional day for all of the teachers at the high school with students not in attendance. On Saturday, Home B.A.S.E. hosted a design charrette for next years' build.

Thursday was the only day we had on site this week.

It was very cold and it had snowed and put about three inches of snow in our house which we had to shovel out.

Also on Thursday, Contract Lumber arranged to have our very steep roof trusses installed. By the end of the day on Thursday, we had our trusses and roof deck on.

Shoveling out the inside of the house in very, very cold weather.


Shoveling the front walk of our house.


Putting On The Roof Trusses

First truss.


VIDEO VIDEO VIDEO Click on the link below.
http://www.youtube.com/watch?v=1-T9QQLx3Jk

Starting the roof deck.


All finished.


Week of January 29, 2007

It was a very, very cold week but extremely cold weather usually brings sunny days :)

We started the week with one long wall laying flat on the 2nd floor deck ready to raise and ended the week on Saturday, February 3rd, with all of exterior and interior walls up!

Mr. Dunaway, our pincipal and Mr. Nally our assistant principal supported us by visiting our site on Wednesday the 31st. Here is a picture of Mr. Dunaway, kneeling second from right, with one of our classes. Green Detail: Notice the foam inside of the header area above the window opening. We elimated the 1/2"OSB sandwich core and replaced the full 2 1/2 " air space with foam and sealed it air tight.


Monday was so cold that we didn't go to site in the morning class. In fact, we've been hit this entire week with a blast of cold artic air. As you can see in the photos, we are all dressed with lots of layers on to keep us warm. Enlarge the picture and see the snow that we constantly had to be clearing from our floor deck.


The photo. on the left shows Craig and Tom working on the interior walls. Advanced Framing/Green Detail: Since we are not using two top plates, we are using Simpson Strong Tie plates with N8 nails to tie the walls together. Also notice that there are no jack studs in the closet door opening or any other interior door opening. In the photo to the upper right, Jesse, Will, Phil, and Craig are framing a complex wall detail. These details were framed at school about a month and a half ago and all of our angled walls fit perfectly.

If you enlarge this photo, one can see the remants of snow after the floor deck was shoveled off to start the days' work.

VIDEO VIDEO VIDEO VIDEO
Click on the link below for a video of the front wall.
http://www.youtube.com/watch?v=jF7PVBuAdtw


The photo in the upper left shows us using our pevee, a new addition to our tool box this year. This simple tool enables us to push and pull our walls straight to an existing chalk line which is barely visible if one enlarges the photo. Being able to easily pull a wall in on the second floor is a big time saver. The photo on the right shows Tom, Will and Jesse at the end of the day in 18 degree weather. It was seven degrees at the start of this day. For cold weather work, we put our cordless drills, sealants, and adhesives inside of the ice chest that has a light bulb in it to keep the batteries from draining and the other materials in a working viscosity.
End of the day on Saturday - a day that was from 9 A.M. until 6 P.M. If one enlarges the picture, one can see all of the walls up in the interior. Also, the temperature dipped to about 0-degrees Farenheit with wind gusts up to 40 mph so we really braced the house. Our house really gets it's strength from the roof.
Week of 1-21-07

This week we moved all of our walls to site, the second floor joists were installed along with the entire floor sheathing for the second floor. One of our joists was in the incorrect spot but that was remedied. We also incorrectly located our second floor window that looks onto the stair landing. We noticed that after the entire wall assembly had been put together with lots of caulk, nails, and sheathing. A tear-apart remedied that problem but it took us about 45 minutes, and of course we all ended up wearing lots of caulk.

Thanks a million to our menter Phil for leading the sheathing crew on the second floor deck.

Also thanks to Greg F., Kathy D., Josh L., Steve S. and Craig B. our community volunteers who came out to help. Our first parent, Megan's dad came out to help for the entire day too. He did really well and we hope to see him again.

Our first faculty member, Ms. Abbott came out to support the students. She probably thought that she would come out and just support us, but she was spotted helping to lift the large wall sections. L or R: Will, Ms. Abbott, Alex, Vinnie, Tom, Megan, Mr. Beck.


Thank you Contract Lumber and Framing www.contractlumber.com for putting in the second level floor joists for us. That saved us a week's time.

The Righter Company http://www.rightercompany.com sent Mike out with the lowboy trailer and we loaded all of our second floor walls onto it and they were transported to site. The day was very cold but we got all of our walls to site so if we put the floor deck on Saturday, we could start with the walls.
Click on the two videos below to see how we install floor decking.

http://www.youtube.com/watch?v=1-MDzgVruzk

http://www.youtube.com/watch?v=oYjGjKeoYpg


If you want to see the high tech. way we put the walls up on our second floor deck, click on the link below.
http://www.youtube.com/watch?v=H33-5xMknHw

The link above shows how the walls get to the second floor. The picture to the left shows the wall sections assembled, straightened, squared, ready for sealant and wall sheathing to be followed by lots of nailing. Besides the large amount of energy saving because of the extra insulation, we find the 2 x 6 stud construction at 24 inches between studs nails up a lot more quickly than conventional framing. By looking in the background, one can really tell we are up on the second floor.
Week of January 15, 2007

The entire first floor has it's interior and exterior walls framed and is now ready for the second floor deck.

A correction and omission from last week's blog and good news about a former student.

1. The company that graciously donates their resources to move our walls is the Righter Company:
http://www.rightercompany.com/
Our apologies for misspelling their name in last week's blog. They have helped move our walls for two years, donated hard hats to the entire class, and also donated a job box were we store all of our power tools. Thank you Righter Company!
2. We forgot to put "D's" picture last week. D stopped by last week and helped us a bit and even "gave it all for Home B.A.S.E." by getting getting construction adhesive on his brand new Contract Lumber coat. He has a tremendous amount of experience in construction and anytime he is with us, he makes what we do better. Below is Don "D" McClary III of Contract Lumber and Framing.


3. Two weeks ago, Mike Rigo Home B.A.S.E. 2000, was diagnosed with a tumor on his brain stem and underwent surgery on Friday the 19th. He was under ten hours of anesthesia. An after site visit to Mike on Saturday showed that he was doing better than expected after just coming out of the intensive care unit. He only took two aspirin for pain in the 24 hours after the surgery and the prognosis is encouraging. Mike, this is something duct tape can't fix so you will be in all of our thoughts and prayers :)

On Friday, some students came in on their day off and assembled and stood up the north wall (on the left). Our mentor Jim came was with us too on this day when we had to scrape snow off of our floor deck. After site, we all went out to have a bite to eat together at a local cafe that uses local and organic ingredients. Eating at locally owned restaurants keeps 43 cents of every dollar in the community as compared to 19 cents for a chain restaurant located outside of our community. More money in the local Columbus economy helps more families be able to afford their own homes.


Above left: We are framing the first floor wall with recycled sheathing.
Above right: Notice the caulk around the window and on the top and bottom plate which will help keep our house weather tight and dry. We also put constuction adhesive below on the floor deck under the walls which help stop air infiltration. Air moving through a wall or house is the same as moisture and heat moving. We used the Cold Climate Builder's Guide from our partner, the Building Science Corporation.
http://www.buildingscience.com/
Just a note though, when there is caulk or construction adhesive on site, we usually end up wearing either or both.

We have used Titebond polyurethane construction adhesive donated from Franklin International which we really like because it is much more pliable than the traditional construction adhesive. We also use Franklin polyurethane caulk. http://www.titebond.com/

Left above: Standing up the
front wall. From left to right you'll see Craig, Tom, Megan, and Phil our mentor.

Above right: the front wall is up.


Week of 1-8-2007

A big week for us as we are finally on site and the house can start to take shape. We ended the week with an all day field trip on site where we sheathed the floor deck and assembled, sheathed, and stood up our first wall.

A television crew came out on Friday the 12th to tape us for the local news.

Scholastic Magazine will be taking pictures of the build this week to feature us on their cover and with a story in their nationally distributed magazine.

An update will be sent on when both of these media pieces can be seen.


Sawing the concrete floor so if it does crack, the cracks will be controlled to crack along these cuts.


Because of Contract Framing,
http://www.contractlumber.com/
part of the Contract Lumber Group, our floor has it's structural floor joists installed.


Floor joists at the end of the day. Enlarge the picture by clicking on it and the caulk that was put on to seal the house is very visible.


An unavoidable gap between the bottom of the band board and the sill plate. If you click to enlarge the picture, you can see the large air gap and the garage two lots away. We put a sealant underneath the entire band board to keep out the leaks and to help insure a high performance house. This detailing is not done in conventional construction.


Typical view of our sealed band board.


Sheathing the floor deck.


Finally our walls are on site. This picture shows the walls being unloaded from a truck whose services were donated by the Reighter Company. The driver, Waldo, was our driver last year when he delivered our garage walls to us from school. See last year's blog at the bottom of the following link. Waldo is on the left.
http://06homebase.blogspot.com/2006_01_01_06homebase_archive.html


Sheathing our first wall after the floor was sheathed.


Lunch!


Group shot at the end of the day of those who stayed late to finish and stand up our first wall.


Long shot of the finished wall on the finished floor deck.
Week of January 1-5, 2007

Our concrete finisher came in this week and the concrete slab is now in our basement.

We placed two inches of polystyrene foam underneath our slab before the concrete was placed on top. This is another of our high performance building techniques. This foam is very, very important to keep mold from growing. What the foam does is insulate the bottom of the slab and keep it warm. If the bottom surface of the slab is cold and the humidity underneath the slab is at a certain temperature, water will condense on the underside of that slab. Concrete can wick water vertically upt to 400 feet. If there is free water on the underside of the slab, it will be wicked into the basement through the four inch slab. Edwards, Mooney and Moses supplied the foam. Among building scientists, this is one of the most important things builders and homeowners can do when building a house with a basement.

We'll have more pictures in a bit as soon as they come in from several different sources.


Finishing the slab.
Week of December 25-29, 2006

This was winter break for us but we kept the project moving by putting in the outside and interior perimeter drain tiles. Usually builders put in weep holes in the bottom of the walls to let in water from the outside of the building run underneath the basement concrete slab. The Building Science Corporation however thinks it's a bad idea to introduce water underneath the house which makes sense. We also ran on interior drain around the entire inside of our basement. The idea is to capture the water outside the house and have that water be transferred to the interior piping and to the sump well to pumped out. In this manner, we hope to eliminate most of the "free" water under our house.

Another feature of our house build is that we put in a filter fabric on top of the gravel to keep the soil from filtering down and clogging the gravel and thus not letting water reach our drain pipes to be piped away from the house.

We also use polyethylene piping from Advanced Drainage Systems. A lot of times, polyvinyl chloride (PVC) piping is used. The manufacture of PVC is very bad for the environment so we are working to keep our house as PVC free and and "green" as possible.

Putting in the piping was very muddy and wet. Randy, our plumber, also hooked up our water tap.


Excavating the cave-ins around the bottom of the footer where our exterior drain pipes will be placed.


This is a view which shows the excellent water proofing done by Edwards, Mooney, and Moses. Without any prompting, they came by and checked the job and noticed that some of the waterproofing got a little thin because of the rain. They came by without being asked and reapplied the waterproofing.

Also shown is the filter fabric which will help filter out the pipe clogging mud.


Here is the backfilling taking place. In the background is a "slinger" truck. This truck can carry soil or rock and can "throw" the stone right where you want it. Since our house is on a typically narrow turn of the last century city lot, we couldn't get any heavy machinery in to backfill every side of our house so we used a slinger truck to shoot the material in where it was needed.

In the foreground shows our water service pipe coming out in a white sleeve. The water service pipe goes to the street and connects to what is called the water box where the city water comes off of the water main and connects to our water service pipe.
Week of December 18-22, 2006

This project started late in October 2005 and there has been a tremendous amount of work to get this project off the ground. Now our efforts are finally showing as we are now out of the ground which is fantastic!!

With the footers put in place last week, our concrete walls went up.


The concrete wall forms being put up for the walls. The ones that haven't been used are in bunched together in the middle.


Our beautiful finished walls - finally!


The first class scrapes off concrete form ties on a very cold morning.


Alex is down in the "hole" scraping off the footer top in preparation for the water proofing spray which will be applied by Edwards, Mooney and Moses. We spray the top of the footer not just the wall to add to our chances of keeping our basement dry.