Week of February 19, 2007

The temperature got just a bit warmer which allowed us to finish the last framing bits before we start to add the construction details to the building enclosure which will allow the house to deal with managing the moisture. More on that in the later entries when we get to them.
Megan and Vinnie apply sheathing to the bandboard.


Eugene and Jesse shoveling our walk. Not all jobs on our build involve nailing and it was very nice that these two did this job.


Upper left: The class installing sheathing over the bandboard and chipping the ice and snow off of of the back porch gravel.
Upper right: Scott and Phil saw under the bottom plate to enable them to bump out the wall. A huge thanks is owed to Dave M., Scott, Craig B. Stacy W., and Phil who came out to help us this weekend.


The best part of site is lunch which was provided by the Link's.


Explain the Green High Performance Building Feature:
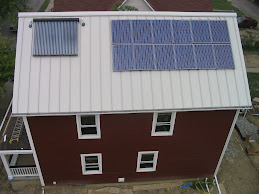
Look at where the shadow is cast on the wall cast by the roof line. Notice where it is in relationship to the top of the second floor windows. Also, look at the same feature in the picture above of Phil sawing. Where the bottom of the shadow hits the south wall of the building is not an accident. Josh Lloyd, who drew up the plans, designed for the roof line shadow and the placement of the windows to work together. Can you explain why it is important to have the shadow/window relationship as it is on our building? Josh will explain that to you in next week's journal entry.


We now have garage walls ...


...and a water-tight roof.
Week of February 12, 2007

We only had one day on site this week. School was closed for two days and the other day we were going to be on site it was -3 degrees.

We had lots of snow this week but on Saturday, we did some work moving a wall.


Students outside our house on Saturday. It snowed most of the day.


Green-High Performance Construction Feature
Our concrete flatwork subcontractor just sent this picture that he took with his camera phone to document that he did indeed put in the foam beneath the slab. This foam beneath the slab is critical to keeping a basement dry and warm.
1. It reduces the moisture coming to the slab.
2. Warms the slab keeping moisture from condensing and wicking to the inside of the basement.
3. The cut-outs in the foam are directly over our pier supports for our posts that support the first floor. The concrete basement slab will bear directly on these concrete piers.

Getting subcontractors to do something that they don't do and have never done before is another one of those little educational "discussions" that has taken place during the construction of this house.
Week of February 5, 2007

School was cancelled Monday, Tuesday, and Wednesday of this week and Friday was a professional day for all of the teachers at the high school with students not in attendance. On Saturday, Home B.A.S.E. hosted a design charrette for next years' build.

Thursday was the only day we had on site this week.

It was very cold and it had snowed and put about three inches of snow in our house which we had to shovel out.

Also on Thursday, Contract Lumber arranged to have our very steep roof trusses installed. By the end of the day on Thursday, we had our trusses and roof deck on.

Shoveling out the inside of the house in very, very cold weather.


Shoveling the front walk of our house.


Putting On The Roof Trusses

First truss.


VIDEO VIDEO VIDEO Click on the link below.
http://www.youtube.com/watch?v=1-T9QQLx3Jk

Starting the roof deck.


All finished.


Week of January 29, 2007

It was a very, very cold week but extremely cold weather usually brings sunny days :)

We started the week with one long wall laying flat on the 2nd floor deck ready to raise and ended the week on Saturday, February 3rd, with all of exterior and interior walls up!

Mr. Dunaway, our pincipal and Mr. Nally our assistant principal supported us by visiting our site on Wednesday the 31st. Here is a picture of Mr. Dunaway, kneeling second from right, with one of our classes. Green Detail: Notice the foam inside of the header area above the window opening. We elimated the 1/2"OSB sandwich core and replaced the full 2 1/2 " air space with foam and sealed it air tight.


Monday was so cold that we didn't go to site in the morning class. In fact, we've been hit this entire week with a blast of cold artic air. As you can see in the photos, we are all dressed with lots of layers on to keep us warm. Enlarge the picture and see the snow that we constantly had to be clearing from our floor deck.


The photo. on the left shows Craig and Tom working on the interior walls. Advanced Framing/Green Detail: Since we are not using two top plates, we are using Simpson Strong Tie plates with N8 nails to tie the walls together. Also notice that there are no jack studs in the closet door opening or any other interior door opening. In the photo to the upper right, Jesse, Will, Phil, and Craig are framing a complex wall detail. These details were framed at school about a month and a half ago and all of our angled walls fit perfectly.

If you enlarge this photo, one can see the remants of snow after the floor deck was shoveled off to start the days' work.

VIDEO VIDEO VIDEO VIDEO
Click on the link below for a video of the front wall.
http://www.youtube.com/watch?v=jF7PVBuAdtw


The photo in the upper left shows us using our pevee, a new addition to our tool box this year. This simple tool enables us to push and pull our walls straight to an existing chalk line which is barely visible if one enlarges the photo. Being able to easily pull a wall in on the second floor is a big time saver. The photo on the right shows Tom, Will and Jesse at the end of the day in 18 degree weather. It was seven degrees at the start of this day. For cold weather work, we put our cordless drills, sealants, and adhesives inside of the ice chest that has a light bulb in it to keep the batteries from draining and the other materials in a working viscosity.
End of the day on Saturday - a day that was from 9 A.M. until 6 P.M. If one enlarges the picture, one can see all of the walls up in the interior. Also, the temperature dipped to about 0-degrees Farenheit with wind gusts up to 40 mph so we really braced the house. Our house really gets it's strength from the roof.